Introduction
Key to a successful machine vision application is a high quality image. Even the best hardware can’t produce great images if it is used incorrect or with suboptimal settings.
Once the lighting has been set up to suit the application, it is time to adapt the industrial colour camera to the lighting situation. This article covers the basic steps from determining the
correct exposure setting to white balance. Finally, it will discuss the differences between the white balance settings of the old and new MER2 camera models.
How to determine the exposure settings
Unlike photography, exposure is not determined by aesthetics, but by the requirements of the application. What feature needs to be visible and identifiable, e.g. by high contrast. A correctly adjusted camera will prevent the areas of interest from being overexposed (light) or underexposed (dark). The following steps will guide you through setting the shutter speed, aperture and gain of a machine vision camera.
- Start with a neutral scene: Begin with a scene that has even lighting and neutral colours. A white paper or our checkerboard target is easy to identify and focus on. This will help you to accurately estimate exposure time without colour bias. For focusing our Testchart can be used. The actual product can be used later.
- Set exposure time: Adjust ExposureTime to control the amount of time the camera's sensor is exposed to light. Higher values allow
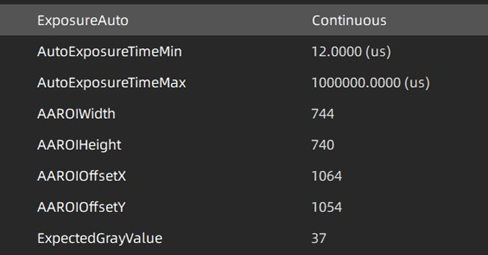
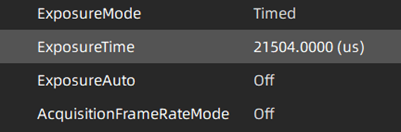 more light in, while lower values reduce the amount of light collected by the sensor. For a quick initial setting, you can use ExposureAuto. The industrial camera will adjust the ExposureTime to achieve a uniform calculated grey value (ExpectedGreyValue) across the entire image. Once this starting point has been established, ExposureAuto should be set to Off and ExposureTime can be adjusted manually. Whenever the cursor is moved over the image, Galaxy Viewer will display the RGB values below the image. This can help identify over- or under-exposed areas.
- Adjust aperture: The primary function of the aperture is to define the depth of field. Depth of field is often not specified down to the millimetre, but rather an area that needs to be in focus. This provides the opportunity to collect more light with a wider aperture (lower f-stops) and allow shorter exposure times.
- Set gain or digital shift: In low light conditions, with short exposure times due to cycle time or with moving objects, it may not be possible to achieve the correct brightness. In these cases, analogue Gain or DigitalShift can be used to amplify the sensor signal and brighten the images. These functions introduce noise into the image and should be used as little as possible.
- Test with varying lighting conditions: If it is relevant to your application, test the camera in a variety of lighting conditions that are relevant to your application to ensure that the exposure settings you have chosen work well in different scenarios.
Please note:
As the settings depend upon one another, it may be necessary to iterate through these steps several times.
Fixed values will lead to a consistent and predictable image quality and should be favoured. In some applications, automatic features like ExposureAuto, are needed to compensate external influences such as ambient light. For further optimization a region of interest (AAROI) can be defined which is responsible for the calculation of the exposure time based on the expected grey value.
Finding the white balance
After the exposure settings have been found, the next step is to adjust the white balance to ensure accurate colour representation. Use a white or neutral-coloured reference target in the scene and adjust the camera settings to remove any colour cast.
- Use a white balance card or grey target: Place a white paper or neutral grey target in the scene. This will provide a reference for accurate colour reproduction. Like ExposureAuto, WhiteBalanceAuto performs its calculations on the entire image by default. AWBROI allows you to define a region of interest for the white balance algorithm.
- Select a white balance mode: The camera features three white
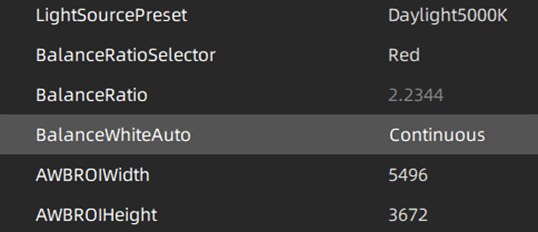 balance modes: Off, Once and Continuous. While in Continuous mode the machine vision camera will constantly adjust the three colour channels to achieve a uniform image. In Once, the calculation will be performed a single time and the results will be stored as BalanceRatio for each channel. The mode Off will be automatically set after a single Once white balance execution. In addition, an experienced user can set the three channels manually after calculating the values with colour calculation target.
- Adjust the colour temperature: The industrial camera allows manual colour temperature adjustment, which can be fine-tuned to achieve a natural colour balance. Cooler temperatures (higher Kelvin values) make the image bluer, while warmer temperatures (lower Kelvin values) tint it amber. The default colour temperature is set to LightSourcePreset=Daylight6500K.
- Evaluate colours: Check the colours in the image to ensure they appear natural and accurate. If possible, compare the captured colours with known reference colours to ensure accurate colour reproduction. If the reference colours are more or less vivid, the saturation mode can help in this situation. A value of 0 produces a monochrome image, while a value of 128 enhances the colours. The SaturationMode is independent of the LightSourcePreset.
- Iterate and fine tune: Iterate between exposure and white balance adjustments until you get a well-exposed image with accurate colours.
Colour correction matrix
Some machine vision cameras allow you to apply a colour correction matrix to compensate for colour inaccuracies. A colour calibration target is used as a known reference to calculate the correct colours. With LightSourcePreset=Custom, the nine values of the correction matrix can be set to the calculated values. Refer to your colour calibration target and camera documentation for information on how to apply or adjust the colour correction matrix parameters.
Differences between MERCURY2 with old FPGA and MERCURY2 with new FPGA
During the course of 2022 DAHENG introduced new FPGAs to all MERCURY2 models. The FPGA (
Field
Programmable
Gate
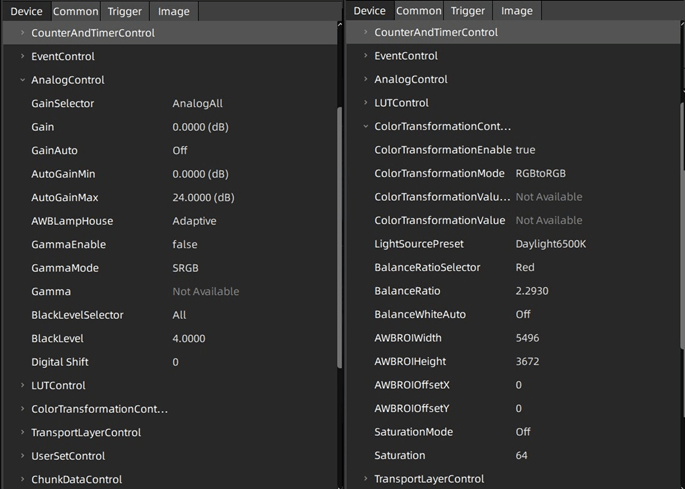
Array) is responsible for collecting the data from the image sensor and all in-camera algorithms. The benefit of the new FPGA is a greater computation power which results in a better performance and new functions. Besides new functions like Event Control, basic image alteration methods were added. These include binning, decimation, mirroring, digital shift, burst mode and image processing options like sharpen and noise reduction.
Old FPGA models provided the white balance and colour correction function AWBLampHouse, located at AnalogControl. This function is replaced with the new FPGA. A similar, more refined functionality can now be found in ColorTransformationControl, described in the paragraph above. ColorTransformationControl provides a more ideal default state and a natural appearance of the image.
If you are using old and new FPGA cameras together in an application, LightSourcePreset should be set to Off. The camera will perform similar to old FPGA cameras, the white balance can be performed manually or with BalanceWhiteAuto as with AWBLampHouse. With the BalanceWhiteAuto parameter now located at ColorTransformationControl, the AWBLampHouse is still available under AnalogControl for white balance preset control. Please note that while the new white balance and colour correction is used, AWBLampHouse should be set to the default value Adaptive. If not, the colours may not be displayed correctly.
Unfortunately, it is not possible to upgrade old FPGA models to the new ColorTransformationCorntrol.
Guidance on fine-tuning camera parameters
Would you like advice from our experienced technical support team on how to achieve the
correct exposure time, white balance or colour correction? We are here to help, please contact us using the form below!
